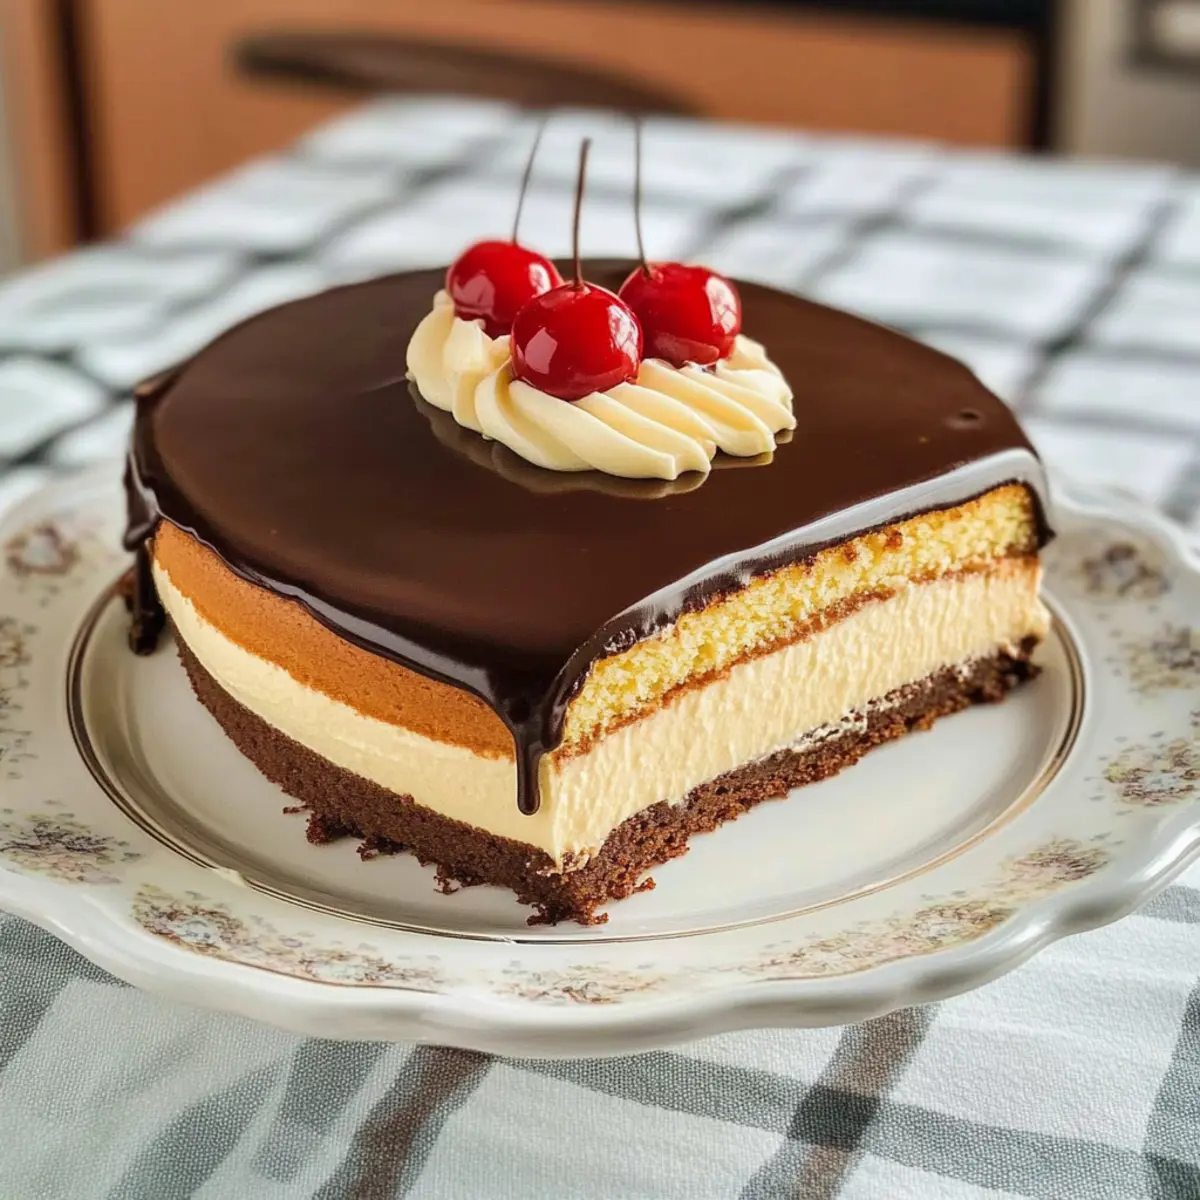
As I pulled the rich, warm cake out of the oven, a wave of nostalgia washed over me. There’s something incredibly comforting about making a classic Boston Cream Pie, and this homemade version is no exception. Packed between two fluffy cake layers is a velvety vanilla custard filling, lovingly topped with luscious chocolate ganache. What I love most about this recipe is its simplicity—it’s a crowd-pleaser that transports you back to family gatherings and celebrations, evoking heartwarming memories with every bite. Plus, it’s a perfect way to impress friends while keeping fast food out of the equation. Are you ready to create your own slice of nostalgia? Let’s dive into the delicious details!
Why is Boston Cream Pie so loved?
Nostalgic Comfort: This classic dessert takes you back to childhood moments, filled with warmth and joy.
Flavor Harmony: The rich chocolate ganache perfectly complements the creamy vanilla custard, creating a dreamy flavor explosion.
Easily Customizable: Want to elevate the experience? Consider swapping in fresh berries or experimenting with different custard flavors, just like in my Caramel Apple Pie variation!
Impressive yet Simple: With straightforward steps, you can achieve a stunning dessert that wows your guests, without hours in the kitchen.
Ideal for Any Occasion: Whether for a birthday, family gathering, or just because, this Boston Cream Pie is always a hit, leaving everyone craving more!
Boston Cream Pie Ingredients
For the Cake Layers
• All-Purpose Flour – Provides structure and stability to the cake layers; substitute with a gluten-free flour blend for a gluten-free option.
• Baking Powder – Acts as a leavening agent to ensure the cake rises properly; essential for texture—skip at your own peril!
• Salt – Enhances flavor of the cake; do not omit for best taste.
• Eggs – Contributes to the cake’s structure and moisture; can use flax eggs as a plant-based substitute.
• Milk – Adds moisture to the batter; alternative dairy or non-dairy milk can be used for variety.
• Vanilla Extract – Infuses the cake with aromatic flavor; pure vanilla extract is preferred for the best aromatic taste.
• Granulated Sugar – Provides sweetness to the cake; consider trying coconut sugar for a less refined option.
For the Custard Filling
• Milk – The base for your creamy custard; ensure it’s whole milk for a richer texture.
• Egg Yolks – Essential for creating the custard’s velvety richness; don’t substitute the yolks for this classic recipe.
• Granulated Sugar – Sweetens the custard while balancing the flavors perfectly—your taste buds will thank you!
• Cornstarch – Thickens the custard to the perfect consistency; don’t skip it!
• Vanilla Extract – Adds depth and warmth to the custard; pure vanilla enhances the overall flavor.
For the Chocolate Ganache
• Heavy Cream – Used for making a silky ganache; coconut cream can be a dairy-free substitute.
• Chocolate – The star that brings the ganache to life, delivering a rich chocolate flavor; dark chocolate is recommended for a deeper taste.
Now that you have all the essentials for creating a moist, fluffy Boston Cream Pie, let’s get to the fun part—baking your delicious masterpiece!
Step‑by‑Step Instructions for Boston Cream Pie
Step 1: Prepare Cake Layers
Begin by preheating your oven to 350°F (175°C). Grease and flour two 9-inch round cake pans, ensuring they are ready for the batter. In a mixing bowl, whisk together the all-purpose flour, baking powder, and salt. In another bowl, blend the eggs, milk, vanilla extract, and granulated sugar until well combined. Slowly pour the wet mixture into the dry ingredients, stirring until smooth and lump-free. Divide the batter between the prepared pans and bake for 25–30 minutes, or until golden and a toothpick inserted comes out clean. Allow the cakes to cool completely in their pans.
Step 2: Make Vanilla Custard
While the cakes cool, prepare the creamy vanilla custard filling. In a saucepan, heat 2 cups of milk over medium heat until steaming, but not boiling. In a separate bowl, whisk egg yolks with sugar until they turn pale and creamy. Gradually temper the egg mixture by slowly adding the hot milk while whisking continuously. Return the mixture to the saucepan and cook over low heat, stirring constantly until it thickens and coats the back of a spoon, about 10 minutes. Remove from heat and stir in vanilla extract. Transfer to a bowl and cover with plastic wrap, pressing it directly onto the custard to prevent a skin from forming.
Step 3: Prepare Chocolate Ganache
To create a luscious chocolate ganache, start by heating 1 cup of heavy cream in a small saucepan over medium heat until it simmers. Remove from heat and add 8 ounces of chopped dark chocolate to the cream. Allow it to sit for 5 minutes so the chocolate can soften. Afterward, gently whisk the mixture until smooth and glossy, ensuring there are no lumps. Set the ganache aside to cool slightly while you assemble the Boston Cream Pie.
Step 4: Assemble Pie
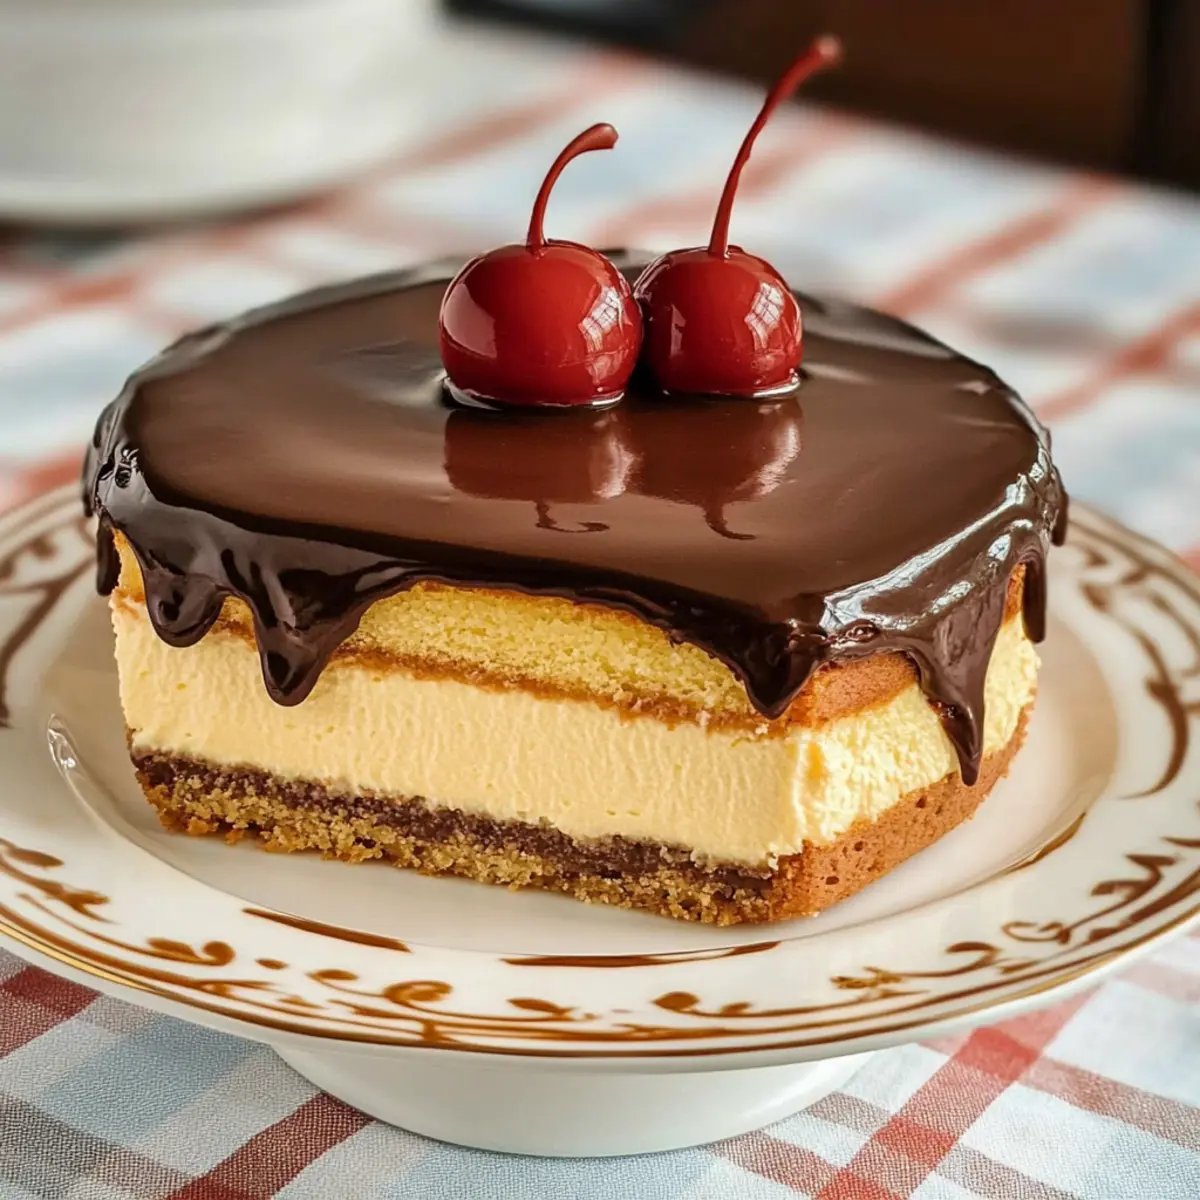
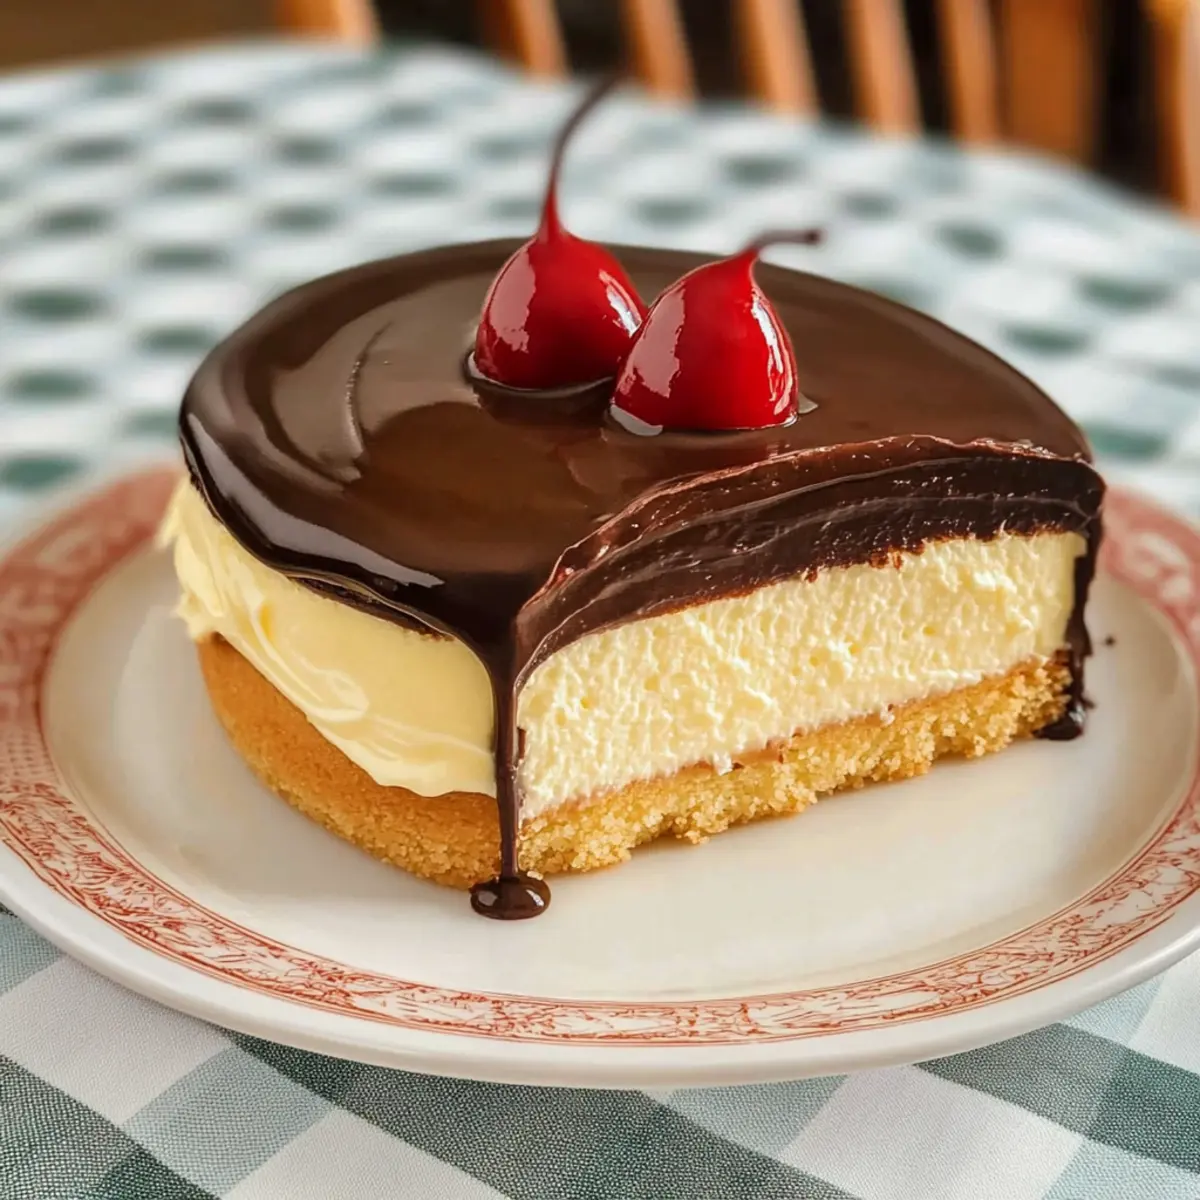
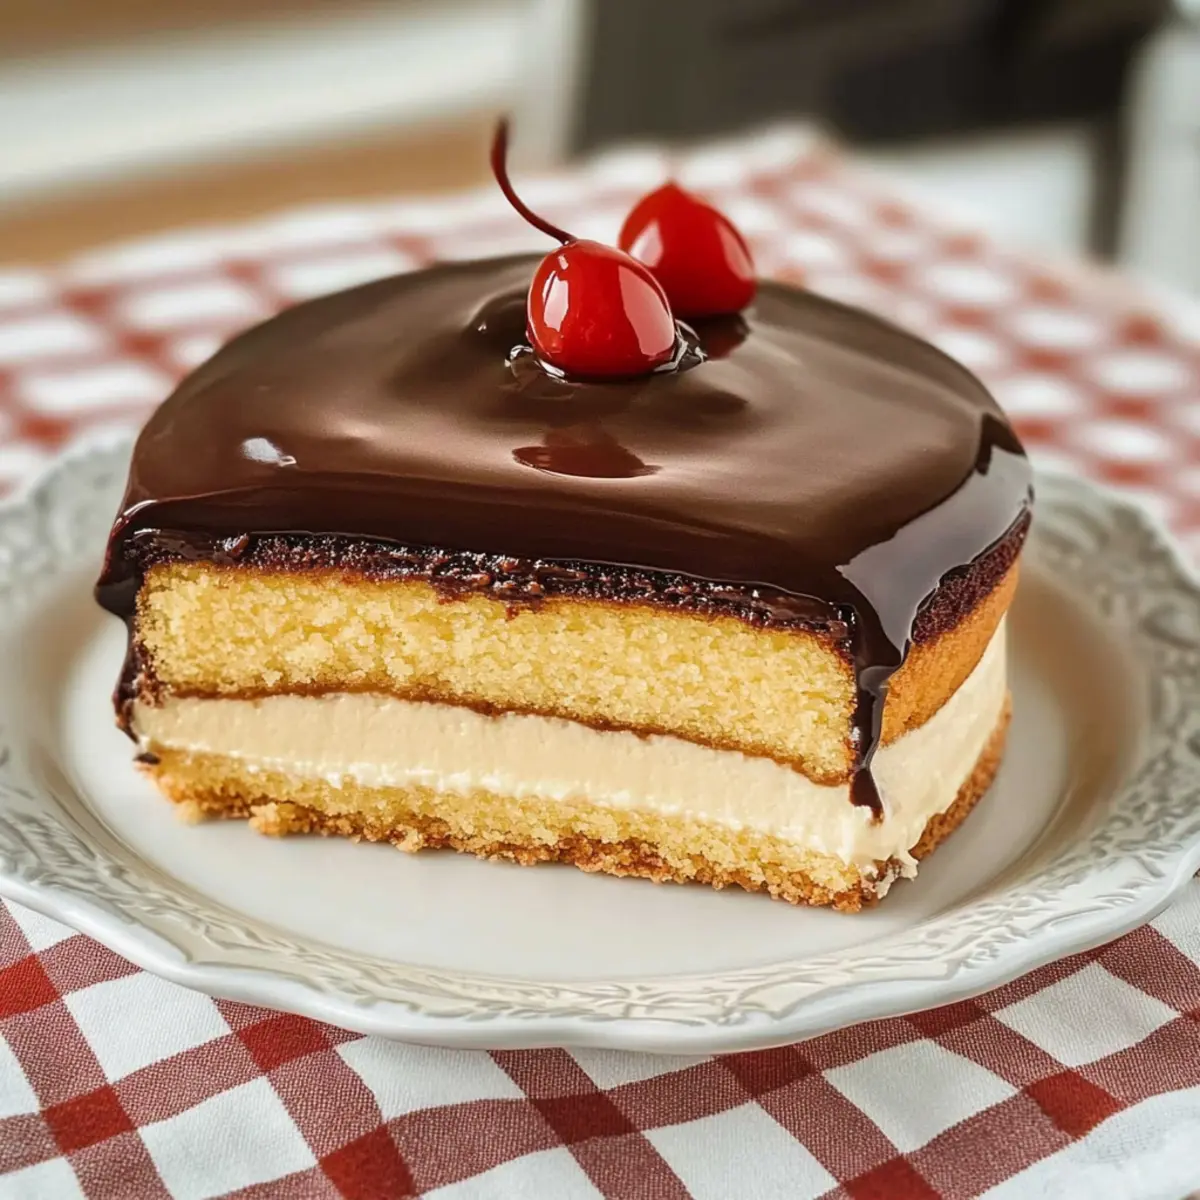
Now it’s time to bring your Boston Cream Pie together! Place one cooled cake layer on a serving plate. Spoon a generous amount of the vanilla custard onto the center of the cake, spreading it evenly to the edges. Carefully place the second cake layer on top of the custard. Pour the warm chocolate ganache over the top layer of the cake, allowing it to drip down the sides for that beautiful finish. Chill the assembled Boston Cream Pie in the refrigerator for at least 30 minutes to let the ganache set before slicing and serving.
Boston Cream Pie Variations & Substitutions
Feel free to let your creativity shine with these delightful tweaks to customize your Boston Cream Pie!
-
Chocolate Custard: Replace the vanilla custard with a rich chocolate version by adding cocoa powder to the recipe for a deeper flavor.
-
Berry Blast: Layer fresh strawberries or blueberries between the cake and custard for a burst of fruity freshness that brightens up each bite.
-
Lemon Zest: Infuse the custard with fresh lemon zest to add a tangy touch, balancing the sweetness wonderfully. This twist brings a delightful brightness to the classic dessert.
-
Coconut Cream: Swap heavy cream with coconut cream in the chocolate ganache for a tropical spin that adds a subtle coconut flavor, perfect for those hot summer days.
-
Maple Syrup: Substitute granulated sugar with maple syrup in the cake batter for a touch of warmth and depth; this will create a subtly sweet, earthy flavor profile that pairs beautifully with the custard.
-
Spiced Cake: Add warming spices like cinnamon or nutmeg to the cake batter for an autumnal twist. These spices can add unexpected complexity that enhances the overall experience.
-
Whipped Cream Topping: For a lighter dessert, replace ganache with freshly whipped cream. This option adds airy texture and lets the flavors of the custard shine, perfect for a lighter, refreshing treat.
-
Dairy-Free: Use almond milk and flax eggs to make the entire pie dairy-free and vegan-friendly, ensuring everyone at the table can indulge in the nostalgia.
Don’t forget, if you’re looking for additional delicious inspiration, my Vanilla Custard Pie and Caramel Apple Pie recipes are worth a glance! Happy baking!
How to Store and Freeze Boston Cream Pie
Fridge: Store your Boston Cream Pie covered in the refrigerator for up to 3 days to maintain its freshness and flavor.
Freezer: For longer storage, slice the pie and wrap each piece individually in plastic wrap and foil. It can be frozen for up to 2 months.
Thawing: When ready to enjoy, thaw individual slices in the refrigerator overnight for the best texture and flavor recovery.
Reheating: If desired, gently warm a slice in the microwave for about 10-15 seconds to soften the ganache, but avoid overheating to maintain the creamy custard.
Expert Tips for Boston Cream Pie
Cool Completely: Ensure both cake layers are completely cool before assembling; this prevents the custard from melting.
Stir Constantly: When making the custard, stir constantly to avoid curdling and achieve a smooth texture—patience is key!
Don’t Skip the Salt: A small pinch of salt in the cake layers enhances the flavors; without it, the taste can fall flat.
Perfect Ganache: Use high-quality dark chocolate for the ganache; it makes a significant difference in flavor—your Boston Cream Pie deserves it!
Chill Before Serving: Allow the assembled pie to chill for at least 30 minutes; this helps the ganache set beautifully and makes slicing easier.
Make Ahead Options
These Boston Cream Pie components are perfect for meal prep enthusiasts! You can make the cake layers up to 24 hours in advance; just ensure they are completely cool, then wrap them tightly in plastic wrap to maintain moisture. The vanilla custard can also be prepared ahead and stored in the refrigerator for up to 3 days—cover it with plastic wrap directly on the surface to prevent a skin from forming. Lastly, the chocolate ganache can be made and refrigerated for up to 5 days; simply reheat gently before pouring over the assembled cake. When you’re ready to serve, layer the custard between the cake layers, top with ganache, and chill to set for a stress-free, delightful dessert experience!
What to Serve with Classic Homemade Boston Cream Pie
There’s nothing quite like the harmony of flavors that pairs perfectly with each slice of this nostalgic delight.
-
Fresh Berries: Serve with a side of strawberries or raspberries to add a refreshing contrast to the sweet creaminess.
-
Whipped Cream: A dollop of lightly sweetened whipped cream enhances the dessert, bringing a fluffy texture that complements the pie beautifully.
-
Coffee: Brew a rich cup of coffee for a cozy pairing; its bitter notes are a delightful balance to the sweetness of the pie.
-
Chocolate Sauce: Drizzle warm chocolate sauce over individual slices for an indulgent touch that chocolate lovers will appreciate.
-
Vanilla Ice Cream: A scoop of vanilla ice cream adds a creamy, cool element that pairs wonderfully with the warm pie.
-
Mint Sprigs: Add a pop of color and a fresh burst of flavor with mint sprigs, elevating your dessert presentation.
-
Hazelnut Liqueur: Serve with a splash of hazelnut liqueur for the adults; it imparts a nutty depth that intertwines beautifully with the chocolate.
-
Toasted Coconut Flakes: Sprinkle toasted coconut on top for an interesting texture contrast that elevates the riot of flavors in each bite.
-
Fruit Compote: A homemade fruit compote made of mixed berries or stone fruits brings a tangy sweetness that cuts through the richness, enhancing every layer of the pie.
Boston Cream Pie Recipe FAQs
How do I choose the right ingredients for my Boston Cream Pie?
Absolutely! When selecting your ingredients, aim for the freshest options. Look for all-purpose flour without any dark spots or clumps, eggs that are fresh with no cracks, and high-quality dark chocolate for the ganache. If you’re using vanilla extract, consider pure extract for the best flavor experience. For the custard, fresh milk is key; avoid anything that’s close to its expiration date.
What is the best way to store leftover Boston Cream Pie?
Very important! Store your Boston Cream Pie covered in the refrigerator for up to 3 days. This will keep both the cake and custard fresh. Simply cover the pie with plastic wrap or place it in an airtight container to prevent it from absorbing any odors from your fridge.
Can I freeze my Boston Cream Pie?
Absolutely! For longer storage, you can slice the pie and wrap each piece individually in plastic wrap followed by aluminum foil. It can be frozen for up to 2 months. When you’re ready to enjoy, simply transfer a slice to the refrigerator and let it thaw overnight. This method retains the flavors and textures beautifully!
What should I do if my custard doesn’t thicken?
No worries! If your custard isn’t thickening as expected, it may be undercooked. Keep cooking it on low heat while stirring constantly for an additional few minutes until it coats the back of a spoon. If it seems too thin after cooling, you can gently reheat it with a bit more cornstarch mixed with a splash of milk, cooking until thickened again.
Are there any dietary considerations for Boston Cream Pie?
Certainly! If you or your guests have dietary restrictions, consider using gluten-free flour for those avoiding gluten and coconut cream as a substitute for heavy cream to make it dairy-free. Additionally, if you have egg allergies, flax eggs work as an effective alternative in the cake layers.
Can I use different flavors for the custard, or should I stick to vanilla?
The more the merrier! Feel free to experiment with different flavors for the custard filling. Chocolate, coffee, or even a hint of citrus zest can elevate your Boston Cream Pie to new heights. Just adjust the sugar levels accordingly to maintain the right balance of sweetness.
Decadent Boston Cream Pie Recipe to Sweeten Your Day
Ingredients
Equipment
Method
- Preheat your oven to 350°F (175°C). Grease and flour two 9-inch round cake pans. In a mixing bowl, whisk together the flour, baking powder, and salt. In another bowl, blend the eggs, milk, vanilla extract, and sugar until well combined. Slowly pour the wet mixture into the dry ingredients, stirring until smooth. Divide the batter between the prepared pans and bake for 25–30 minutes. Allow the cakes to cool completely.
- While the cakes cool, heat 2 cups of milk over medium heat until steaming. In a separate bowl, whisk egg yolks with sugar until pale. Gradually temper by adding hot milk while whisking. Return to saucepan and cook until thickened, about 10 minutes. Stir in vanilla extract. Transfer to a bowl and cover with plastic wrap.
- To create the ganache, heat 1 cup of cream in a saucepan until it simmers. Remove from heat, add chopped dark chocolate, and let sit for 5 minutes. Whisk until smooth and glossy.
- To assemble, place one cooled cake layer on a serving plate. Spoon custard onto the center, spreading it evenly. Place the second cake layer on top and pour the warm ganache over the top, allowing it to drip down. Chill for at least 30 minutes before slicing.
Leave a Reply