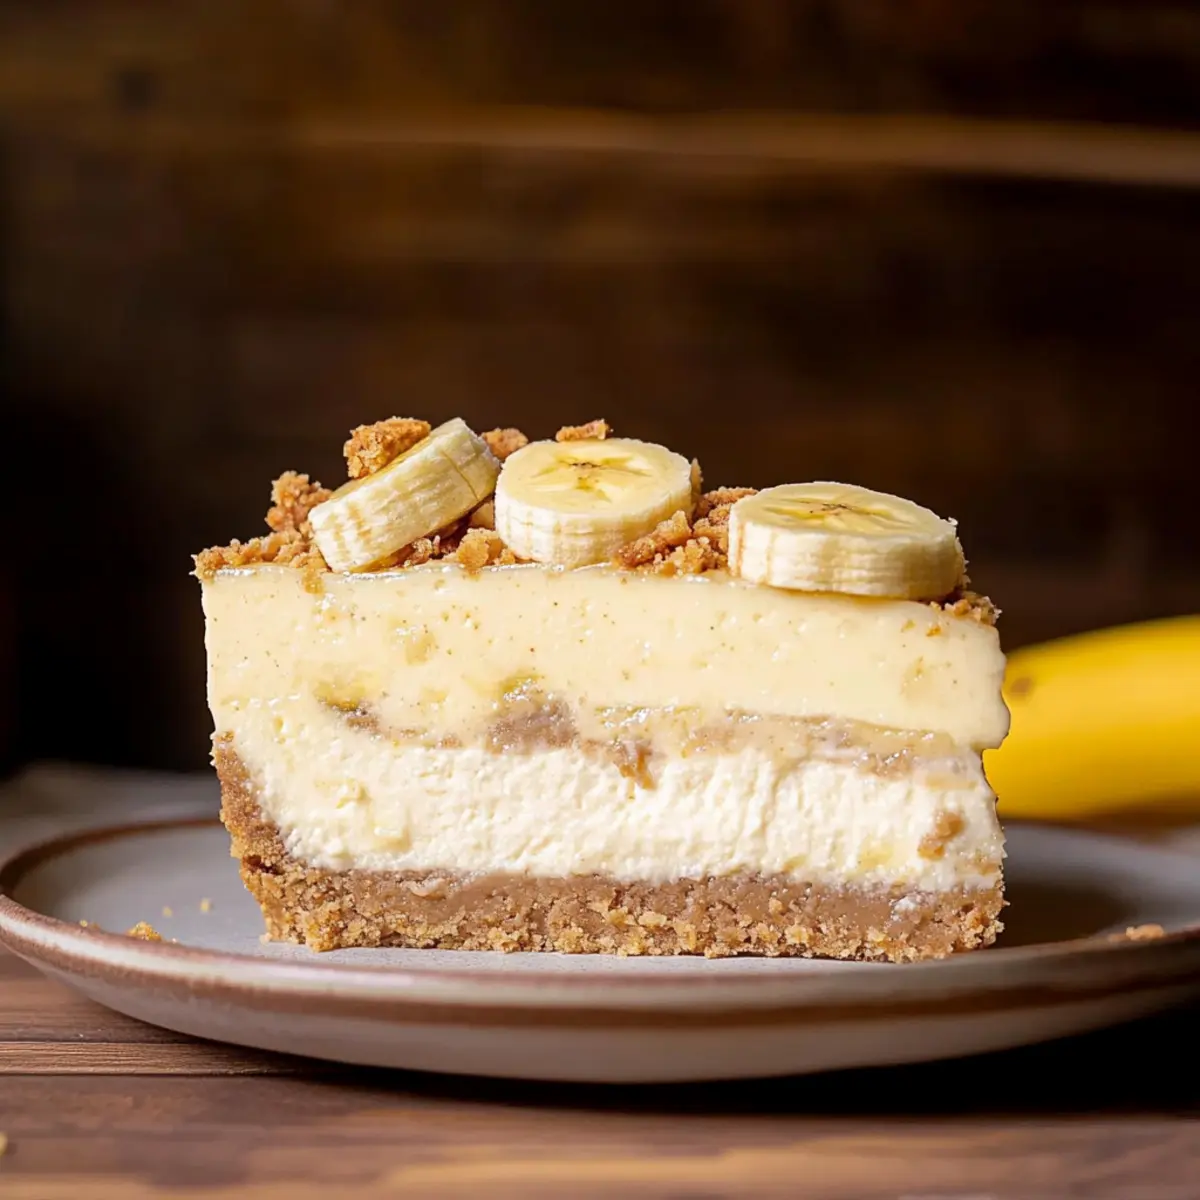
As I stood in the kitchen, the aroma of ripe bananas mingling with the buttery scent of Nilla Wafers transported me back to sun-drenched summers spent at my grandmother’s house. She would whip up her famous Banana Pudding Cheesecake, delighting everyone with its creamy layers and crunchy crust. This recipe is a heartwarming twist on that beloved classic, combining the nostalgic flavors of banana pudding with the richness of cheesecake, delivering a dessert experience that never fails to impress. Not only is it a showstopper for gatherings, but it’s also surprisingly simple to make—perfect for anyone eager to swap fast food for homemade goodness. Are you ready to create a dessert that will have everyone asking for seconds? Let’s dive into the delightful world of Banana Pudding Cheesecake together!
Why is this cheesecake a must-try?
Decadent Layers: The creamy banana cheesecake filling paired with a crunchy Nilla Wafer crust creates a delightful harmony of textures that will tantalize your taste buds.
Nostalgic Flavors: Experience the comforting taste of banana pudding in a new, rich format—guaranteed to remind you of sweet summer days.
Impressive Presentation: This cheesecake not only tastes amazing but looks stunning, perfect for impressing guests at gatherings or special occasions.
Easy Preparation: With straightforward steps and accessible ingredients, this dessert is surprisingly simple to create—great for both novice bakers and experienced chefs alike.
Make-Ahead Delight: Prepare it the day before, allowing the flavors to deepen overnight, so it’s ready when you are! Pair it with a warm caramel drizzle or serve alongside Cinnamon Swirl Banana for an irresistible treat.
Banana Pudding Cheesecake Ingredients
For the Crust
• Nilla Wafers – The star ingredient for a crunchy and sweet cheesecake base; feel free to substitute with any similar vanilla cookie.
• Brown Sugar – Adds a rich molasses flavor to the crust; you can use light or dark brown sugar based on your preference.
• Unsalted Butter – Binds everything together; make sure it’s melted before mixing for best results.
For the Cheesecake Filling
• Cream Cheese – The creamy backbone of the filling; ensure it’s at room temperature for optimal mixing.
• Granulated Sugar – Provides sweetness; stick with granulated as other alternatives might change the texture.
• Pure Vanilla Extract – Infuses a lovely aroma into both the cheesecake and the topping; substitute with vanilla bean paste for a twist if desired.
• Bananas (Mashed) – The highlight flavor that gives the cheesecake its deliciousness; ripe bananas work best here.
• Sour Cream – Introduces a tangy creaminess; Greek yogurt can serve as a substitute if needed.
• Heavy Cream – For a rich topping that enhances the cheesecake’s decadence; make sure it’s cold for whipping.
• Eggs – Ensure the cheesecake has structure; using room temperature eggs helps in blending smoothly.
For the Layers
• Crushed Nilla Wafers – Adds delightful texture between the cheesecake layers; use freshly crushed for the best results.
• Bananas (Sliced) – Provides extra banana flavor and a beautiful visual layer; choose ripe but firm bananas for the best balance.
For the Topping
• Instant Vanilla Pudding – Creates the luscious topping that holds its shape well; use the standard 3.4 oz size.
• Milk – Necessary for mixing the pudding; ensure it’s cold to set properly.
• Crushed Nilla Wafers (for decoration) – Aesthetically pleasing finish to your dessert that complements the overall presentation.
The banana pudding cheesecake is one that will not only fill your heart but also create memorable experiences at any gathering. Let’s get started!
Step‑by‑Step Instructions for Banana Pudding Cheesecake
Step 1: Preheat the Oven
Begin by preheating your oven to 325°F (163°C). While the oven warms up, prepare a 9-inch springform pan by greasing it lightly with butter or cooking spray. This will ensure easy removal of the Banana Pudding Cheesecake once it’s beautifully baked and cooled.
Step 2: Make the Nilla Wafer Crust
In a mixing bowl, combine crushed Nilla Wafers, brown sugar, and melted unsalted butter. Stir until the mixture resembles wet sand. Press this mixture firmly into the bottom and slightly up the sides of your prepared springform pan. Bake the crust for 11 minutes, until golden and fragrant, and allow it to cool on a wire rack.
Step 3: Prepare the Cheesecake Filling
In a large mixing bowl, beat softened cream cheese and granulated sugar together until smooth and creamy. Gradually mix in mashed bananas, pure vanilla extract, sour cream, and heavy cream until well incorporated. Make sure the mixture is free of lumps, which ensures a velvety Banana Pudding Cheesecake filling that everyone will love.
Step 4: Incorporate the Eggs
Next, add eggs to the creamed mixture, one at a time, mixing on low speed after each addition until just combined. This helps maintain the creamy texture while preventing overmixing, which can lead to cracks in your cheesecake. Once all the eggs are mixed in, pour half of the filling over the cooled crust.
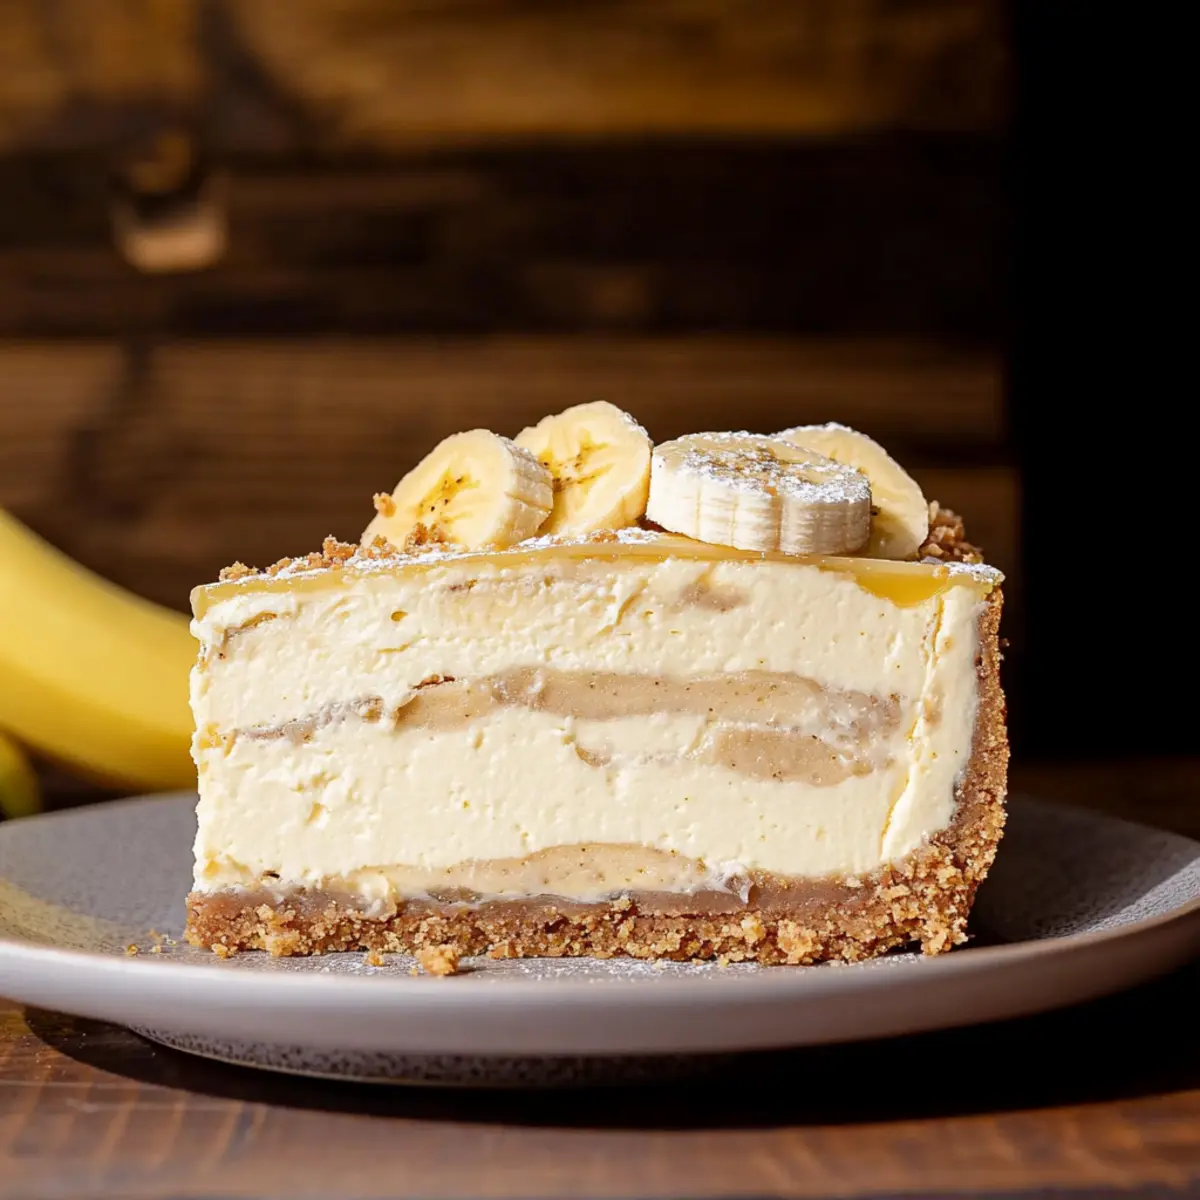
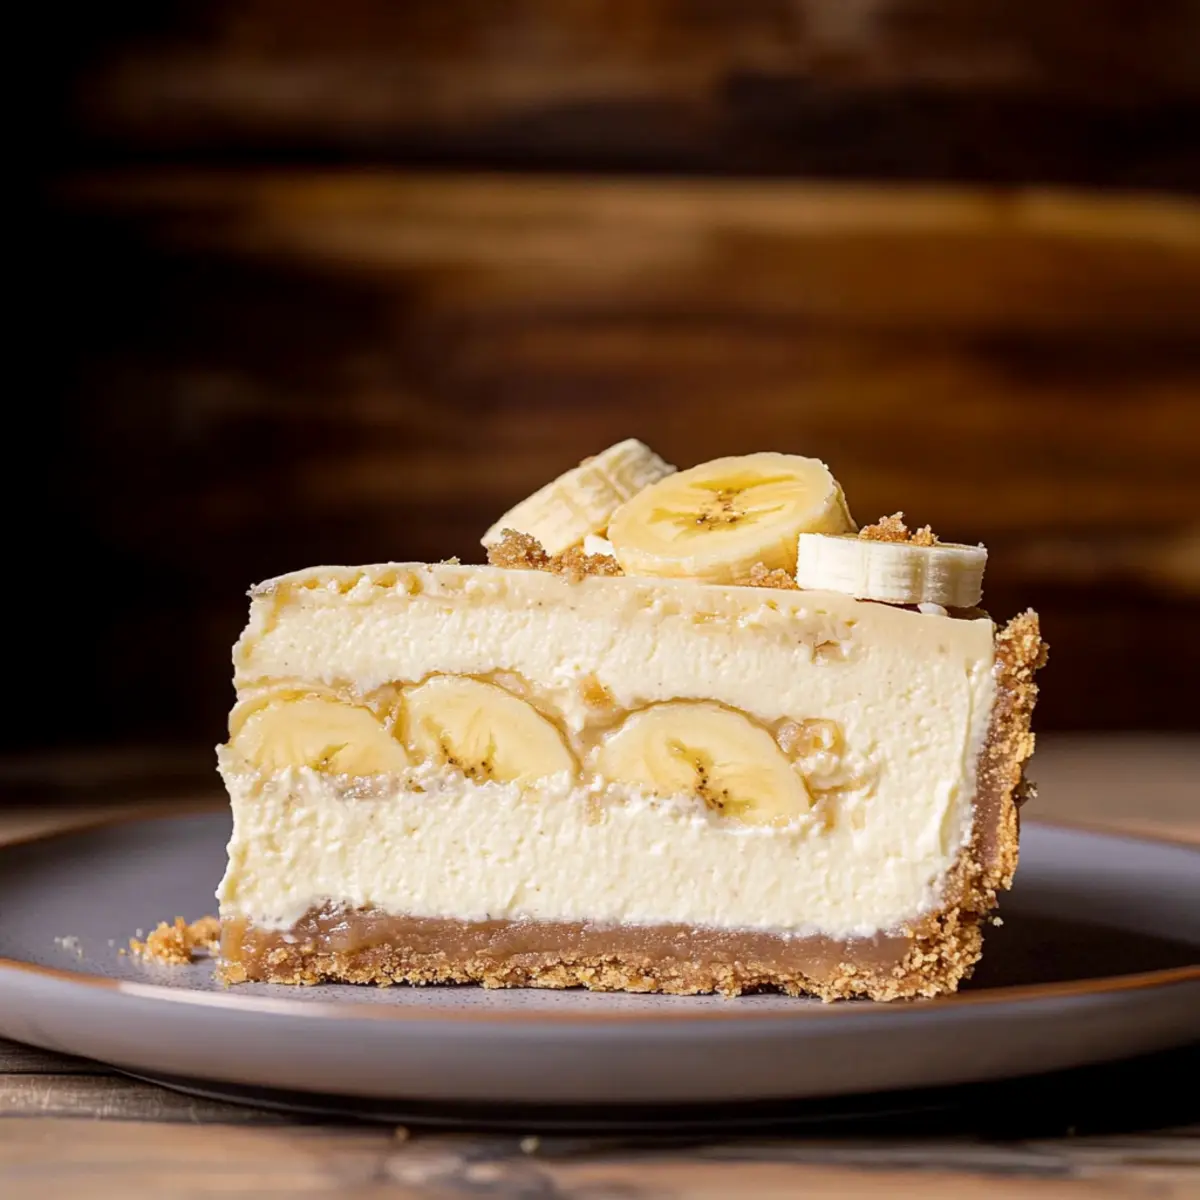
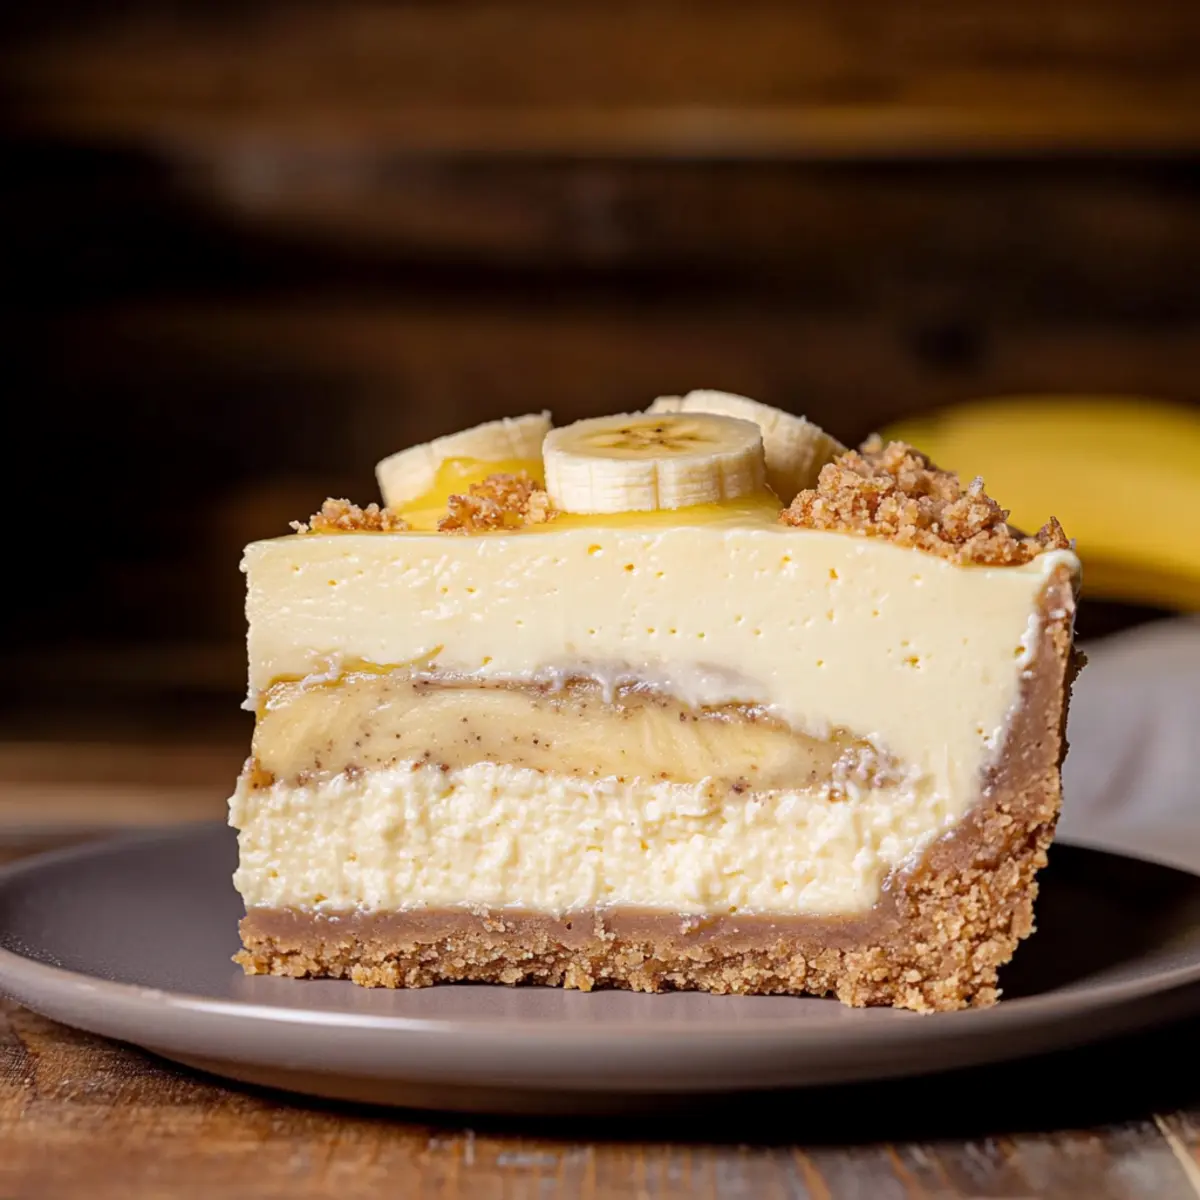
Step 5: Layer with Bananas and Crushed Wafers
Sprinkle sliced bananas and crushed Nilla Wafers evenly over the first layer of cheesecake filling. This will introduce delightful textures and flavors throughout the Banana Pudding Cheesecake. Pour the remaining filling over the top, ensuring all layers are covered and well-distributed for a cohesive dessert.
Step 6: Set Up a Water Bath
To prevent the cheesecake from cracking, set up a water bath by placing the springform pan in a larger baking dish filled with hot water. Make sure the water comes about halfway up the sides of the springform pan. Carefully place the entire setup in your preheated oven and bake for 80-90 minutes, until the center of the cheesecake is just slightly jiggly.
Step 7: Cool Gradually
Once baked, turn off the oven and crack the door open. Allow the Banana Pudding Cheesecake to cool in the oven for 30 minutes. This gradual cooling process helps prevent cracking caused by sudden temperature changes. Then, remove the cheesecake from the water bath and refrigerate for at least 6 hours, or overnight for best results.
Step 8: Prepare the Whipped Vanilla Pudding
For the luscious topping, whisk together the instant vanilla pudding mix and cold milk in a bowl until it thickens, about 2 minutes. Fold in whipped heavy cream gently, creating a fluffy and light mixture. This delicious topping provides an extra layer of creamy goodness that enhances the overall dessert experience.
Step 9: Assemble the Final Touches
After chilling, carefully spread the whipped vanilla pudding topping over the cooled Banana Pudding Cheesecake. Use a spatula to create a smooth, even layer. Finally, sprinkle crushed Nilla Wafers on top for an attractive decorating touch that adds a crunchy contrast, making your cheesecake both beautiful and irresistible.
Expert Tips for Banana Pudding Cheesecake
-
Room Temperature Dairy: Ensure all dairy ingredients are at room temperature for the creamiest filling and to prevent lumps in your banana pudding cheesecake.
-
Crust Perfection: Don’t skip baking your Nilla Wafer crust; it sets the stage for a crunchy base that complements the creamy filling beautifully.
-
Eggs Matter: Add eggs one at a time and mix on low speed to avoid incorporating too much air, which can cause cracks in the cheesecake.
-
Water Bath Care: Be cautious when setting up your water bath; wrap the springform pan in aluminum foil to prevent water from seeping in.
-
Chill Time: For the best texture and flavor, let the cheesecake chill overnight. This allows all the flavors to meld together beautifully.
-
Presentation Touch: Top with fresh banana slices and a sprinkle of crushed Nilla Wafers right before serving for an appealing finish to your banana pudding cheesecake.
Make Ahead Options
These Banana Pudding Cheesecake layers are perfect for meal prep, allowing you to enjoy this delightful dessert with minimal stress on the day of serving! You can prepare the crust and filling up to 24 hours in advance. Simply make the Nilla Wafer crust as instructed, cover it tightly with plastic wrap, and refrigerate. You can also mix the cheesecake filling and store it in the fridge; just be sure to cover it to prevent oxidation. When ready to assemble, simply pour the chilled filling over the prepared crust, layer with bananas and crushed wafers, and bake as directed. This way, you’ll have a smooth and creamy Banana Pudding Cheesecake that tastes just as delicious as if freshly made!
Banana Pudding Cheesecake Variations
Embrace creativity in the kitchen by customizing your delicious Banana Pudding Cheesecake with these delightful twists.
- Graham Cracker Crust: Swap out Nilla Wafers for graham crackers to add a honeyed flavor to the base. This slight change can create a lovely contrast to the creamy filling.
- Chocolate Chip Surprise: Fold in semi-sweet or dark chocolate chips into the cheesecake filling for a decadent twist that chocolate lovers will adore. The combination of banana and chocolate is simply heavenly!
- Sour Cream Alternatives: Substitute sour cream with Greek yogurt for a tangy flavor that adds a protein boost without compromising creaminess. This variation is perfect for those looking for a healthier option!
- Caramel Drizzle: For a sumptuous finish, drizzle homemade or store-bought caramel sauce over the whipped topping. The rich caramel adds depth and extra sweetness that complements the bananas delightfully.
- Nutty Crunch: Add crushed nuts, like walnuts or pecans, either in the filling or as a topping. This element of crunch adds a textural contrast that pairs beautifully with the cheesecake’s creaminess.
- Banana Rum Flavor: Incorporate a splash of banana liqueur or dark rum into the filling for an adult twist on your classic cheesecake. The warm flavors amplify the banana richness in an enticing way.
- Tropical Vibe: Mix in shredded coconut or top with toasted coconut before serving. This tropical touch elevates the flavor profile and offers a unique spin reminiscent of a beach getaway.
- Spiced Variation: Add a pinch of cinnamon or nutmeg to the filling for a warm, spiced note that harmonizes beautifully with the bananas, reminiscent of homemade banana bread.
Explore these variations to create a dessert that fits your mood and occasion. And if you’re feeling inspired, try pairing your cheesecake with Apple Cheesecake Bars or delightful Cookie Butter Cheesecake Cups for an unforgettable spread.
What to Serve with Banana Pudding Cheesecake
Imagine a table filled with delightful dishes that perfectly complement the creamy, dreamy layers of your banana pudding cheesecake.
-
Fresh Fruit Salad: A burst of colorful fruits adds brightness, and the natural sweetness balances the richness of the cheesecake, creating a refreshing contrast.
-
Coconut Whipped Cream: Light and airy, this topping enhances the tropical notes of the cheesecake while adding a fluffy texture that your guests will adore.
-
Chocolate Drizzle: A simple drizzle of melted chocolate offers a decadent touch—its richness elevates the cheesecake, making each bite irresistible.
-
Classic Vanilla Ice Cream: Serve a scoop of vanilla ice cream alongside for a delightful temperature contrast. The creaminess complements the banana flavors beautifully.
-
Coffee or Espresso: A steaming cup of coffee or a shot of espresso brings a caffeinated kick that pairs well with the sweet cheesecake, enhancing its flavors.
-
Mint Infused Water: A refreshing glass of mint-infused water cleanses the palate, providing a light and invigorating drink choice to offset the cheesecake’s richness.
-
Caramel Sauce: Drizzle caramel sauce on top for an extra layer of sweetness; its lusciousness marries well with the banana flavors in the cheesecake.
Combine these options for a memorable meal that encourages conversation and leaves everyone delighted!
Storage Tips for Banana Pudding Cheesecake
-
Fridge: Store the banana pudding cheesecake covered with plastic wrap or in an airtight container in the refrigerator for up to 5 days. This keeps it fresh and ready for dessert cravings!
-
Freezer: If needing longer storage, freeze individual slices in airtight containers or wrap in plastic wrap followed by foil for up to 2 months. Thaw in the fridge before serving.
-
Reheating: For a fresh taste, allow frozen slices to thaw overnight in the refrigerator, then bring to room temperature before enjoying, or lightly reheat in the microwave for 10-15 seconds to warm it slightly.
-
Serving Suggestions: Top with whipped cream or extra slices of ripe banana right before serving to enhance the beauty and flavor of your banana pudding cheesecake!
Banana Pudding Cheesecake Recipe FAQs
What type of bananas should I use for the cheesecake?
Absolutely! For the best flavor and texture in your Banana Pudding Cheesecake, use ripe bananas. Look for bananas that have a few brown spots, indicating they are sweet and soft enough to mash easily. However, make sure they are not overly ripe or mushy, which can lead to off flavors.
How do I store the Banana Pudding Cheesecake?
You can store your Banana Pudding Cheesecake in the refrigerator for up to 5 days. Just cover it with plastic wrap or place it in an airtight container to keep it fresh. This way, you can enjoy a slice each day without losing any of its deliciousness!
Can I freeze this cheesecake?
Yes, you can! To freeze your Banana Pudding Cheesecake, first slice it up, then wrap individual pieces tightly in plastic wrap, followed by aluminum foil, to prevent freezer burn. This will keep it tasty for up to 2 months. When you’re ready to enjoy it, simply transfer the slices to the refrigerator to thaw overnight.
What should I do if my cheesecake cracks while baking?
No worries! If your cheesecake cracks, it’s usually caused by overmixing or a sudden temperature change. To avoid this, mix the filling on a low setting once you add the eggs. If cracks do occur, you can cover them up with the whipped topping—it’ll look beautiful nonetheless!
Is this cheesecake suitable for people with dairy allergies?
Not quite! The Banana Pudding Cheesecake contains several dairy ingredients such as cream cheese, heavy cream, and sour cream. If you’re looking for a dairy-free version, consider using dairy-free cream cheese and coconut cream instead of heavy cream to achieve a similar creamy texture while avoiding dairy.
Irresistible Banana Pudding Cheesecake You’ll Want to Make
Ingredients
Equipment
Method
- Preheat your oven to 325°F (163°C) and grease a 9-inch springform pan.
- Combine crushed Nilla Wafers, brown sugar, and melted butter, then press into the bottom and sides of the pan. Bake for 11 minutes and let cool.
- Beat cream cheese and granulated sugar until smooth. Mix in mashed bananas, vanilla extract, sour cream, and heavy cream until incorporated.
- Add eggs one at a time, mixing on low speed until just combined, and pour half the filling over the crust.
- Sprinkle sliced bananas and crushed Nilla Wafers over the first layer, then pour the remaining filling on top.
- Set up a water bath and bake for 80-90 minutes until slightly jiggly in the center.
- Turn off the oven, crack the door, and cool in the oven for 30 minutes. Then refrigerate for at least 6 hours, or overnight.
- Whisk together instant vanilla pudding and cold milk until thickened. Fold in whipped heavy cream.
- Spread the whipped pudding over the cheesecake and sprinkle with crushed Nilla Wafers before serving.
Leave a Reply